Deploying a Jekyll Blog to Cloudflare Pages
A static blog has no server to maintain, no database to back up, and no security patches to apply. You write markdown, push to git, and the site updates in seconds.
This post covers how this blog is set up: Jekyll with the just-the-docs theme, deployed to Cloudflare Pages from a GitHub repository.
Why static
WordPress needs PHP, a database, regular updates, security plugins, and a server that costs money to run. A static site needs none of that. The HTML is pre-built, served from a CDN, and costs nothing to host.
For a technical blog where the content is guides and notes, static is the right choice. The content doesn’t need a CMS - it’s markdown files in a git repo.
The stack
- Jekyll - static site generator (Ruby, mature, huge plugin ecosystem)
- just-the-docs - clean documentation theme with search, dark mode, sidebar navigation
- Cloudflare Pages - free hosting with automatic SSL, global CDN, GitHub integration
- GitHub repo - source control (Cloudflare Pages works with private repos too)
Total cost: $0/month. The personal domain is the only expense.
Setting up Jekyll
Gemfile
source "https://rubygems.org"

gem "jekyll", "~> 4.3"
gem "just-the-docs", "~> 0.10"

group :jekyll_plugins do
  gem "jekyll-seo-tag"
  gem "jekyll-feed"
end
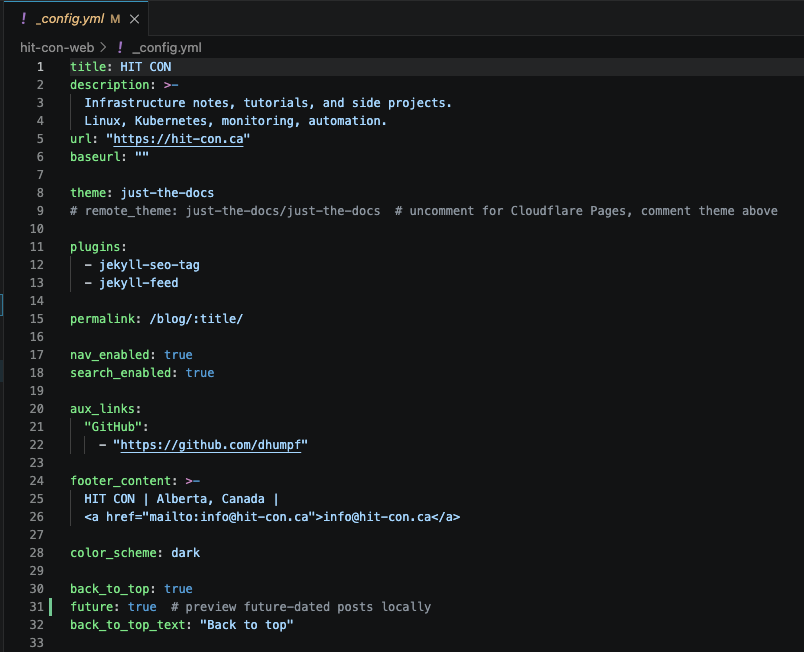
_config.yml
title: Your Site Title
description: >-
  One-line description for search engines.
url: "https://yourdomain.com"
baseurl: ""

remote_theme: just-the-docs/just-the-docs

plugins:
  - jekyll-seo-tag
  - jekyll-feed

permalink: /blog/:title/

color_scheme: dark
nav_enabled: true
search_enabled: true
back_to_top: true

footer_content: "Your footer text"
Note: use theme: just-the-docs for local development, switch to remote_theme: just-the-docs/just-the-docs for Cloudflare Pages deployment (Cloudflare doesn’t install gems from a Gemfile).
Directory structure
site/
  .gitignore
  Gemfile
  _config.yml
  index.md              # landing page
  blog.md               # blog index
  _posts/               # blog posts (YYYY-MM-DD-title.md)
  assets/img/           # screenshots, diagrams
Writing a page
Every page needs a YAML header block (called “frontmatter”) between triple dashes at the top of the file. Jekyll uses it to set the title, layout, and metadata:
---
layout: default
title: "Page Title"
description: "Short description for search engines"
nav_order: 1
---

# Page Title

Content in markdown.
Writing a blog post
Posts go in _posts/ with the naming convention YYYY-MM-DD-title-slug.md:
---
layout: default
title: "Your Post Title"
description: "Post description for search engines and blog index"
parent: Blog
nav_exclude: true
---

# Your Post Title

Post content here.
The parent: Blog and nav_exclude: true keep posts out of the sidebar navigation but listed on the blog index page.
Local development
bundle install
bundle exec jekyll serve --host 0.0.0.0 --port 4000
Browse to http://localhost:4000. Jekyll auto-rebuilds on file changes.

Deploying to Cloudflare Pages
1. Push to GitHub
Create a repository and push your site:
git init
git add -A
git commit -m "initial site"
git remote add origin [email protected]:you/your-site.git
git push -u origin main
2. Connect to Cloudflare Pages
- Log into Cloudflare Dashboard
- Go to Compute > Workers and Pages > Create application > Pages > Connect to Git
- Select your repository
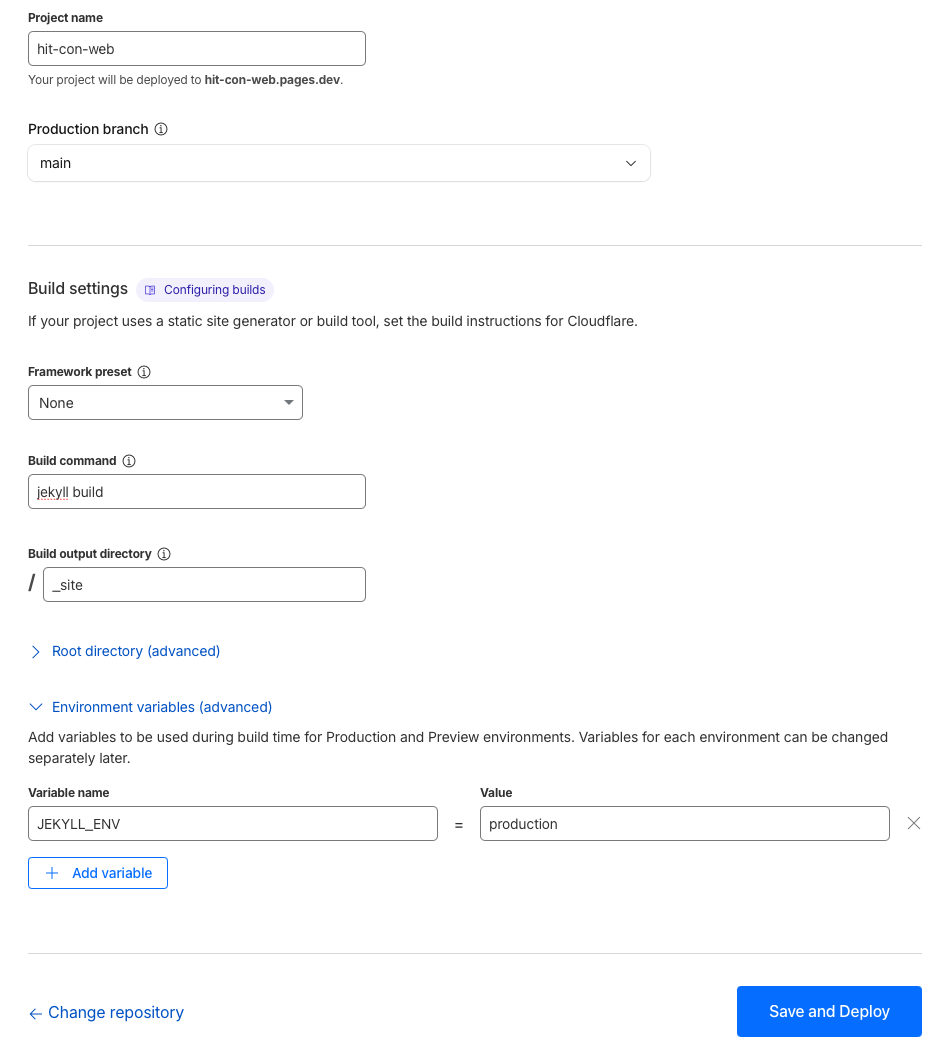
- Build settings:
- Framework preset: None (not Jekyll - the preset is outdated)
- Build command:
jekyll build - Build output directory:
_site
- Environment variables:
JEKYLL_ENV=production
3. Custom domain
- In Cloudflare Pages project settings > Custom domains
- Add your domain (e.g.
yourdomain.com) - If DNS is already on Cloudflare, it auto-configures
- SSL is automatic - no cert management needed
4. First deployment
Push any change to main and Cloudflare builds and deploys automatically. Typical build time: 30-60 seconds.

The result
Push to main, site updates in under a minute. No CI/CD config, no server, no maintenance. The blog is a git repo with markdown files - version controlled, portable, and free to host.
Write it once, reference it whenever you need it.
What I’d do differently
Commit your Gemfile.lock. I initially gitignored it and Cloudflare Pages resolved different gem versions than my local setup. The build ran but the theme didn’t load - just black on white text. Committing the lock file fixed it. Cloudflare needs the exact versions to match.
Add descriptions from the start. Every page should have a description in the YAML header from day one. Going back and adding them to 30 pages later is no fun.
Use bundle exec jekyll build if things look off. The build command jekyll build works in most cases, but if Cloudflare picks up a different Jekyll or theme version than your Gemfile.lock expects, the build might succeed while the site looks wrong. Using bundle exec jekyll build as the build command forces the exact gem versions from your lock file. Not always needed, but worth switching to if you hit version mismatches.
Don’t over-design. just-the-docs looks good out of the box. The dark theme, search, and sidebar navigation are built in. Spend time writing content, not customizing CSS.